


The source is as follows:
Video : 282 MB, 933 Kbps, 23.976 fps, 624*352 (16:9), XVID = XVID Mpeg-4, Supported
Audio : 58 MB, 194 Kbps, 48000 Hz, 2 channels, 0x55 = MPEG Layer-3, Supported
I want to make it into a standard 16:9 720x576 PAL DVD I am using AVISynth with the following settings:
AVISource("d:\wedding day\cutting the cake.avi")
assumefps(25,sync_audio=true)
resampleaudio(48000)
Lanczosresize(720,576)
And TMPGEnc with the following settings:
Stream Type = Mpeg 2
Size = 720x576
Aspect Ratio = 16:9
Frame Rate = 25
Rate Control Mode = 2 Pass VBR ave = 2500 max =3000 min =2000 P Spoil = 0 B Spoil = 0 Padding not enabled
VBR Buffer Size = 0 (Automatic)
Profile = MP@ML
Video Format = PAL
Encode Mode = Non-Interlace
YUV = 4:2:0
Compression = 10Bits
Motion Search = Very Slow
Video Source Type = Non-Interlace (progressive)
Field Order = Bottom Field First
Source Aspect Ratio = 4:3 625 Line (PAL, 704x576)
Video Arrange = Full Screen
Nothing has check marks in the boxes below!
It just does not look as good as I think it could! The audio is out of sync as well but I am sure if I do the audio with besweet and mux it on that will be fixed. Can anyone point me in the right direction to make it look better? I think this process is creating and deleting frames which is what I am trying to avoid. The source is a prograssive IVTC with no interlace and the final product always seems to be interlaced no matter what i do!
Thanks in advance for any help!
+ Reply to Thread
Results 1 to 11 of 11
-
-
I would first extract the audio from the Xvid and get it into a 16-bit 48k Stereo PCM WAV file.
The way I do it is to load the Xvid into GOLDWAVE then save the audio as 16-bit 48k Stereo PCM WAV file.
Once you have that you can change the PCM WAV file from 23.976fps to 25fps using BeSweet and the BeSweet GUI ... be sure to use the latest BETA versions of both.
Also make sure when you do the conversion that you go straight from PCM WAV to PCM WAV. Once you get your time corrected PCM WAV you can then convert it to your target format such as AC-3 format.
So when you get around to using TMPGEnc you want to JUST do the video with it ... not the audio.
I started writing a guide on how to do this with TMPGEnc but I never finished the guide. Actually the guide is finished in regard to the video conversion just that I never did the DETAILED steps on doing the audio although what I wrote above is your general steps of AUDIO CONVERSION.
Here is my VIDEO ONLY guide using just TMPGEnc ... please note that when doing this type of conversion with TMPGEnc that AviSynth is not needed ... this is really only true when your source is progressive 23.976fps NTSC which is the best form of NTSC to convert to PAL as interlaced 29.970fps NTSC is a bit of a "trick" to convert properly.
GUIDE STARTS HERE
This is a simple guide (or so I hope) to help you convert PAL format videos to NTSC DVD format using the TMPGEnc Plus MPEG encoder.
I will cover conversion of several different types of PAL files including AVI file and MPEG files as well as a DVD (which you must first rip in FILE MODE with DVD Decrypter).
MPEG-1 files can be loaded directly into TMPGEnc Plus as can AVI files be they DivX or Xvid or DV or even from a capture using HuffyUV or PICVideo MJPEG etc.
If you have ripped a PAL DVD to your HDD then you need to run it through DVD2AVI to get your demuxed audio (which is probably going to be AC-3) and your D2V project file.
If you already have an MPEG-1 file or an AVI file you can skip this next section to USING TMPGEnc PLUS
USING DVD2AVI
This program is actually pretty simple you to use. If you have an MPEG-2 file you simply load that single file. If you have ripped a PAL DVD to your HDD using FILE MODE in DVD Decrypter you have to make sure you find the right "set" of files to load ... i.e., the set that corresponds to the portion of video on the DVD you want to convert be it the main movie or an extra like a theatrical trailer etc.
Usually the main movie will be someting like this:
VTS_01_1.VOB
VTS_01_2.VOB
VTS_01_3.VOB
VTS_01_4.VOB
Just load the first file (in this example VTS_01_1.VOB) and the rest that correspond will auto load.
Run the PREVIEW for a moment by hitting the F5 KEY then stop it by hitting the ESC KEY.
Now across the top CLICK on VIDEO and set up as follows:
iDCT Algorithm ---> Leave at default (32-bit SSE MMX)
FIELD OPERATOIN ---> NONE
COLOR SPACE ---> YUV 4:2:2
YUV -> RGB ---> TV SCALE
LUMINANCE FILTER ---> Leave at default (not checkmarked i.e., don't use)
CLIP & RESIZE ---> Leave at default (not checkmarked i.e., don't use)
Now across the top CLICK on AUDIO and set up as follows:
TRACK NUMBER ---> NONE
CHANNEL FORMAT ---> AUTO SELECT
DOLBY DIGITAL ---> DEMUX ALL TRACKS
MPEG AUDIO ---> DEMUX ALL TRACKS
48 -> 44.1KHz ---> Leave at default (OFF)
NORMALIZATION ---> Leave at default (not checkmarked i.e., don't use)
Now look at the Statistics Window that poped up when you did the preview. Note the aspect ratio. It will either be 4:3 or 16:9 ... remember this!
Now CLICK the F4 KEY to save your project file which will have a .D2V at the end. The file folder you select will contain not only your D2V project file but also your DEMUXED AUDIO which will most likely be AC-3
USING TMPGenc PLUS
We are now ready to load our video file be it an AVI or an MPEG-1 or a D2V project file from DVD2AVI
So fire up TMPGEnc Plus and kill the WIZARD if it comes up. Just to make sure I'm starting from "scratch" I like to go to FILE and select NEW PRJECT.
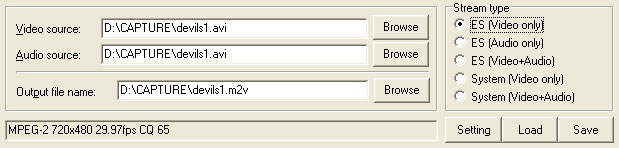
Now down near the bottom where it says VIDEO SOURCE you want to click on BROWSE and add your VIDEO FILE. If you have an AVI or MPEG-1 file the file will also auto-load for the AUDIO SOURCE. This is fine but bear in mind we will NOT be using TMPGEnc Plus for audio conversion but instead ONLY for the video.
Now under stream type it says SETTINGS - LOAD - SAVE
We want to CLICK on LOAD and load the NTSC DVD template.
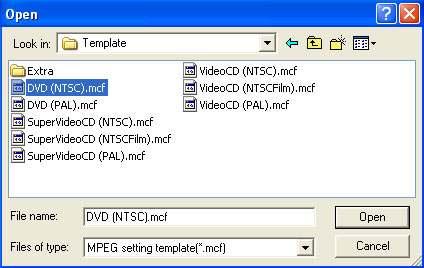
SELECT the correct file (highlighted in my example above) and CLICK on OPEN. We are now back to the main "page" of TMPGEnc Plus.
Now we have to load the UNLOCK template. So again CLICK on LOAD and load the UNLOCK template:
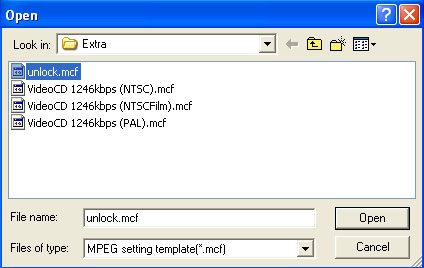
SELECT the correct file (highlighted in my example above) and CLICK on OPEN. We are now again back to the main "page" of TMPGEnc Plus.
Make sure you now click on ES (Video only) under STREAM TYPE.
This is an example of what you should see (note in this example I'm using an AVI file as a source file):
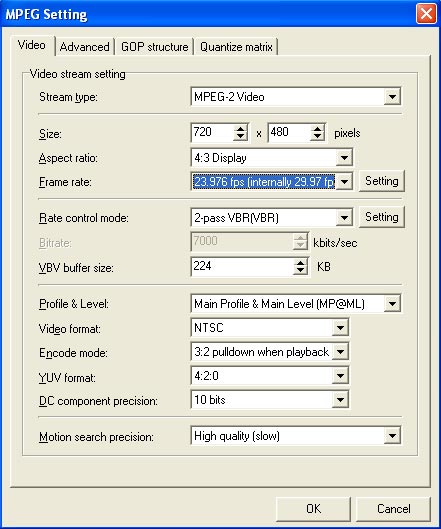
Now we want to click on SETTINGS and this will bring up the MPEG SETTING window. It should default to the VIDEO TAB.
This is the default you should be looking at:
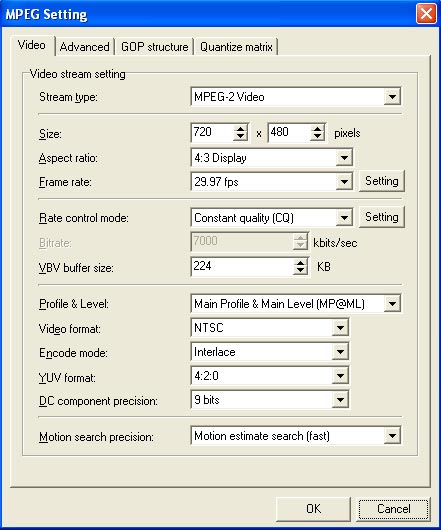
We need to change some of these settings and we need to change some in a certain order so follow closely now class
We are NOT touching STREAM TYPE nor SIZE.
ASPECT RATIO: This is for the type of video you will be making. You can do 4:3 here if your source is 4:3 or 16:9 if your source is 16:9. If you source is 4:3 but widescreen you might be able to make a 16:9 DVD as long as the aspect ratio of the original 4:3 WS video is at least 1.78:1 and yes most 4:3 WS videos are at least that much although some (very few) are only 1.66:1 in which case you should probably just make a 4:3 DVD.
FRAME RATE needs to be changed but we can't do it just yet. So skip it for now.
RATE CONTROL: This sets your encode mode. I suggest you go with a 2-pass VBR unless your video is very short and you can use a very high bitrate ... in which case you might be able to get away with a CBR encode. Basically I'm convering how to do PAL to NTSC conversion so I assume you know how to set this and your bitrate. Remember to account for your separate audio file when selecting your video bitrate here. In my example I'm doing a 2-pass VBR with a MIN of 2000kbps an AVG of 5000kbps and a MAX of 8000kbps.
Now ignore the next few choices (which we don't want to change) and skip on down to:
ENCODE MODE: Set this to "3:2 pulldown on playback"
YUV FORMAT: Leave this at 4:2:0
DC COMPONENT PRECISION: Set this to 10 BITS
MOTION SEARCH PRECISION: Again I assume you know how to encode with TMPGEnc Plus so you pick whatever you want. As for myself I usually pick the setting called, "HIGH QUALITY (SLOW)"
Now remember we didn't change the FRAME RATE before. We couldn't do this until we selected "3:2 pulldown on playback" for the ENCODE MODE.
Now that that setting is set we can go back to:
FRAME RATE: Change this with the little drop down button so it reads, "23.976fps (internally 29.970fps)"
You should now see something like this:
Now we can continue to the ADVANCED TAB and set it up correctly.
VIDEO SOURCE TYPE: Set this to PROGRESSIVE
FIELD ORDER: Since we set the above to PROGRESSIVE this has no bearing. Just leave it to whatever it says.
SOURCE ASPECT RATIO: This setting can differ depending on the type of file you are using.
If your file is an MPEG-4 AVI such as DivX or Xvid then you want to set this to read, "1:1 (VGA)" because that is the pixel format that MPEG-4 codecs use. Just about all MPEG-4 AVI files are in a 4:3 ratio even if they are widescreen so again this is the correct setting unless you have something odd like a 16x9 MPEG-4 video. In which case you will probably have to set this to CENTER (CUSTOM SIZE) for the VIDEO ARRANGE METHOD and type in your own resize values. The program FitCD is good for determining the values you need for such a proceedure.
If your file is an MPEG-1 file then EMPTY THIS NEEDS TO BE FILLED IN!
If your file is a D2V project file then you set this to either "4:3 625 line (PAL)" or you set it to "16:9 625 line (PAL)" again based on what your source file aspect ratio is as reported by DVD2AVI.
VIDEO ARRANGE METHOD: Again this can differ based on the type of file you are using as a source.
If you set source aspect ratio to a setting that applies to your video then all you really have to do for VIDEO ARRNAGE METHOD is select "FULL SCREEN (KEEP ASPECT RATIO)"
There are 2 exceptions to this that I can think of.
You have a PAL DVD that is 4:3 WS that you want to convert to 16x9 anamorphic.
For that you select FULL SCREEN for your VIDEO ARRANGE METHOD and then you need to go down to the CLIP FRAME option.
Double click it and the CLIP FRAME window pops up.
Cut 72 from the top and 72 from the bottom. Now CLICK on OK to return to the ADVANCED MENU.
That will convert a 4:3 WS PAL source to 16x9 NTSC DVD.
Now what if you have a file with an "odd" frame size or aspect ratio?
Well here you can select "CENTER (CUSTOM SIZE)" for the VIDEO ARRANGE METHOD and enter in the size you want your video to be. This is of course a special case and you will probably know (be an advanced enough user) if this needs to be done. Again FitCD is a good way to determine the values to enter.
I have a capture card that is a BT based capture card. To capture PAL video I have to capture at 696x576 instead of the more normal 720x576 otherwise I get an incorrect aspect ratio. So I have to select "CENTER (CUSTOM SIZE)" and enter 696 width and since I'm converting from PAL to NTSC I select 480 (not 576) for the hieight. TMPGEnc will then "pad" my file by centering it thus in this example I get 12 black on either side of the image to reach the standard 720x480 NTSC DVD frame size.
I realize this was long but I'm trying to cover all the bases here.
Now there are all kinds of "neat" options on this ADVANCED TAB and some are really usefull like the NOISE REDUCTION option but there is one option here that we must checkmark for proper PAL to NTSC conversion.
That option is "DO NOT FRAME RATE CONVERSION" so be sure this is check marked.
What does it do? Basically by checking this off we are telling TMPGEnc Plus to convert our 25fps PAL source to 23.976fps by simply encoding it at the slower rate. No frames are dropped to achieve this. This will cause the video to become longer in running time now that what it was. This is why we had to change the audio so that we maintain audio sync.
Using my example my ADVANCED TAB now looks like this:
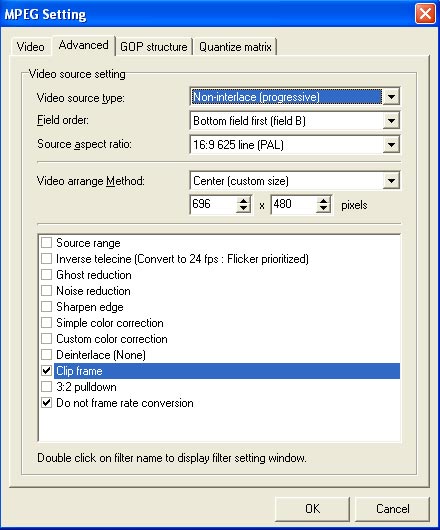
Now notice here that I did CENTER (CUSTOM SIZE) for VIDEO ARRANGE METHOD. Please remember that this superceeds the setting for SOURCE ASPECT RATIO. In other words whatever you have selected for SOURCE ASPECT RATIO is ignored by seleting CENTER (CUSTOM SIZE) for the VIDEO ARRANGE METHOD.
In my example I'm using my PAL capture which was done at 696x576 and I'm resizing it to 696x480 and TMPGEnc is going to add 12 black on either side so it ends up being 720x480 which is the proper size for NTSC DVD.
However this PAL video I captured was widescreen so I've decided to make it 16x9 enhanced. I went back to the VIDEO TAB and selected "16:9 Display" for the ASPECT RATIO setting. Then I entered the CLIP FRAME option and did this:
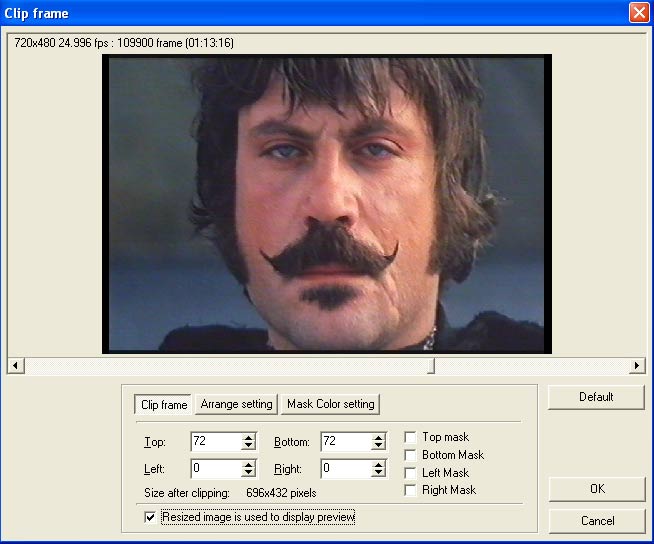
Notice there is a hint of black above and below the image. That is because this movie has an aspect ratio of approximately 1.85:1 ... if the aspect ratio was say 2.35:1 then there would be even more black visible. It is important to note that no matter WHAT the aspect ratio of the original 4:3 video is ... as long as it is at least 1.78:1 or more ... you still only cut 72 from the top and bottom for conversion to 16x9 enhanced.
GUESS WHAT? ... we are finally done with this part! Rejoice as we are almost home now
Now notice that there are two more tabs on the MPEG SETTING window. One is called "GOP STRUCTURE" and we do NOT need to change anything there.
The other tab is called "QUANTIZE MATRIX" and again we do NOT need to change anything there except for perhaps the option entitled, "Output YUV data as Basic YCbCr not CCIR601"
This is the most "dreaded" option in TMPGEnc Plus because for the most part no one is really sure what it does. For most sources we do NOT want to check it and the default is already that way ... it is not check marked. The advanced user may want to check it but beware checking it can do BAD stuff to your LUMINANCE values so don't check mark it unless you know you need to do it.
At this point we are DONE and can CLICK on OK at the bottom of the MPEG SETTING window.
We are now back at the main TMPGEnc Plus "page".
We are now ready to encode HOWEVER we just did a lot of work setting this all up didn't we? So just to be 'safe' go to FILE and click on SAVE PROJECT. This will save all of your settings in case anything should happen i.e., the computer crashes while encoding because that sex website you were on went nuts with auto pop-up ads or maybe a thunderstorm knocks out the electricity etc.
It takes a LONG time to do MPEG-2 encoding. So it is worth saving your settings to a file.
But once that is done you are ready to encode ... simply CLICK on START up there in the upper left hand corner and back many hours later to a finished M2V video file that is now NTSC DVD compliant
Comments are of course most welcomed and encouranged!
- John "FulciLives" Coleman
P.S.
A screen grab of TMPGEnc Plus doing the sample encode I set up above:

Notice the REMAINING TIME listed? I set this guide up because it is EASY doing PAL to NTSC with TMPGEnc Plus and it is a popular encoder. However having said that I no longer use TMPGEnc Plus myself because I have a slow computer and TMPGEnc Plus is known to be the slowest MPEG encoder ever. I now use AviSynth and Cinema Craft Encoder (CCE) to do all my encodings. It is more flexible and MUCH faster :P
CLICK HERE for a thread on this WEBSITE where I detail the method I use for PAL to NTSC DVD conversion using AviSynth and CCE.
END OF GUIDE
Remember you need to do the audio first so you can properly determine the video bitrate you need to use in TMPGEnc.
Eventually I will finalize this guide complete with detailed audio conversion steps and post it in the GUIDES SECTION of this website.
- John "FulciLives" Coleman"The eyes are the first thing that you have to destroy ... because they have seen too many bad things" - Lucio Fulci
EXPLORE THE FILMS OF LUCIO FULCI - THE MAESTRO OF GORE
-
OK like the complete dumb ass that I am I just realized I posted my 25fps progressive PAL to 23.976fps progressive NTSC guide.
However the process to do the reverse ... 23.976fps progressive NTSC to 25fps progressive PAL is really more-or-less the same thing ... just that you are going the "other way".
So the process is just about the same except you want to use 25fps and 720x576 as your target and you don't have to worry about the 3:2 pulldown nonesense.
If you need more details (if you find it confusing) then let me know.
- John "FulciLives" Coleman"The eyes are the first thing that you have to destroy ... because they have seen too many bad things" - Lucio Fulci
EXPLORE THE FILMS OF LUCIO FULCI - THE MAESTRO OF GORE
-
I need NTSC to PAL. How do I do that? Do I just use the same settings as I was using before without loading the avs? Just load the avi directly to TMPGEnc and check the "DO NOT FRAME RATE CONVERT" box?
-
Stream Type = Mpeg 2
Size = 352x576
Aspect Ratio = 16:9
Frame Rate = 25
Rate Control Mode = 2 Pass VBR ave = 2500 max =3000 min =2000 P Spoil = 0 B Spoil = 0 Padding not enabled
VBR Buffer Size = 0 (Automatic)
Profile = MP@ML
Video Format = PAL
Encode Mode = Non-Interlace
YUV = 4:2:0
Compression = 10Bits
Motion Search = Very Slow
Video Source Type = Non-Interlace (progressive)
Field Order = Bottom Field First
Source Aspect Ratio = 1:1 (VGA)
Video Arrange = Full Screen
NO FRAME RATE CONVERT is checked!
This is better but still not as good as the frames I had in the jerky version! Any ideas as to why? -
To do 16x9 you need to use Full D1 resolution which is 720x576 or 704x576 for the PAL format. Half D1 resolution (352x576 PAL) cannot be 16x9 enhanced.
The "easy" way to do this ... just use the WIZARD MODE and select your AVI for the VIDEO source and your NTSC to PAL corrected PCM WAV file as your AUDIO source.
Make sure you select a PAL DVD template and make sure to select "DO NOT FRAME RATE CONVERSION"
In the end you will have a proper 25fps M2V video and PCM WAV audio. The PCM WAV audio will just be a copy of the one you input.
- John "FulciLives" Coleman"The eyes are the first thing that you have to destroy ... because they have seen too many bad things" - Lucio Fulci
EXPLORE THE FILMS OF LUCIO FULCI - THE MAESTRO OF GORE
-
I figured out the problem. But it has made things worse! For some reason when I convert the audio from 30->25 instead of 24->25 with BeSweet the sync is perfect! But it is so slow I can't even bare to watch it or try to undrestand it! Perhaps this is caused by the IVTC AVI being 24 FPS but 30 FPS internaly? If I use TMPGEnc to do inverse telecine on the file it takes the frames back out, but I am wasting time, and processor making frames that are just going to be deleted and I am probably losing good frames and keeping bad frames in the process! anyone have a better way of doing this?
Thanks -
I went by your guide and I noticed that you say in tmpgenc plus not to worry about the audio file. My file I'm loading into tmpgenc plus is a d2v file and there was no audio file loaded. So, once I ran the program and then checked the output file on the pc there is no audio.
So, did i miss something? The guide ends after starting tmpgenc, so are there more steps somewhere that I didn't do?
Thanks!
DarkCyber -
"The eyes are the first thing that you have to destroy ... because they have seen too many bad things" - Lucio Fulci
EXPLORE THE FILMS OF LUCIO FULCI - THE MAESTRO OF GORE
-
If you want the FULL guide for how to do the "NTSC AVI, DVD, (S)VCD --> PAL DVD, (S)VCD" conversion then go to https://www.videohelp.com/forum/viewtopic.php?p=967874#967874
-
I see most people talking about Time Wrap function. Can someone please clarify on what percentage should the time wrap function be reset to when (say) converting NTSC Film (23,976 FPS) to PAL (25 FPS). I would really appreciate itOriginally Posted by FulciLives
 Quote
Quote
Similar Threads
-
Avisynth manual IVTC trouble
By LoopinFool in forum RestorationReplies: 27Last Post: 16th Apr 2020, 13:42 -
AviSynth or GPU based deinterlacing / IVTC
By topsyturvy in forum Video ConversionReplies: 2Last Post: 7th May 2011, 09:07 -
IVTC for xvid choppy on TV playback
By spiritgumm in forum Video ConversionReplies: 15Last Post: 12th Feb 2011, 10:31 -
IVTC Program on Mac like Avisynth??
By kmxe in forum MacReplies: 0Last Post: 18th Mar 2010, 17:03 -
Avisynth IVTC and fps
By snidwar in forum Video ConversionReplies: 5Last Post: 27th Sep 2008, 22:11