This guide
describes a perfect DivX -> VCD conversion. Including
audio extraction to keep the audio synched when converting
usually caused by Variable Audio Bitrate, splitting and burning.
For this guide I used the movie "Ghost in the Shell"
which I ripped to a 600mb big DivX file and it is about 80
minutes long.
Guide
Tools
required: Latest
VirtualDub,
TMPGEnc
and VCDEasy
Preparing:
- Download
all tools, be sure to extract all files in the zip files.
-
Be
sure to install both DivX 3.11,
DivX 4 and latest DivX
5. You may need to install other
video and audio codecs also, read
here how to identify what
codecs you need.
Audio-extracting:
- Start
Virtualdub. Open your video File->Open video
file.(if you get any warnings just ignore them because
you won't edit the video just extract the audio)
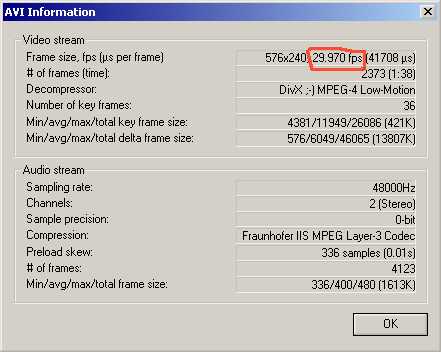
Select File->File Information and note the fps
as the video source fps because you will need it later.
29,970 fps is the video source fps(frames/s) in this case.
- Select
under Audio->Full processing mode.
Select Audio->Compression and select <No
compression (PCM)>

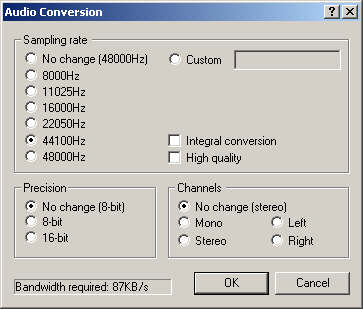
- Select
Audio->Conversion.
Change the the Sampling rate to 44100Hz if you are
going to make VCD or SVCD MPEGs.
- Save
the wav by clicking on File->Save WAV...the wav
will be a huge audio uncompressed video file(about 10 MB/minute
so for this 80 min movie a 800 MB wav file).
Encoding:
- Start
TMPEnc. Press cancel if the Project Wizard comes.
Press Browse… and select the DivX file (in this
case Ghost in the shell.avi) as Video source input.
Now you press the Browse button for choosing the
Audio source input and use the saved wav file.
If you receive anyr errors when opening the video
read here.

- Press
load and load the file which in the Template directory of
TMPGenc.
If the video source fps is 29,970 load
VideoCD (NTSC).mcf
If the video source fps is 23,970 load
VideoCD (NTSCFilm).mcf
If the video source fps is 25,000 load
VideoCD (PAL).mcf
If the video source fps is anything else else
just load NTSC if you live in US or Japan and PAL if you
live anywhere else.
Note if you live in US or Japan and get problem playing
PAL, often causing black and white TV playback problems,
then first check if you can change to PAL on your TV or
DVD Player if not then instead convert it to NTSC by loading
the VideoCD(NTSC) template.
Note if you live Europe and the rest of the world
and get problem playing NTSC or NTSCFilm, often causing
black and white TV playback problems, then first check if
you can change to PAL on your TV or DVD Player if not convert
it to PAL by loading the VideoCD(Pal) template.

- Press
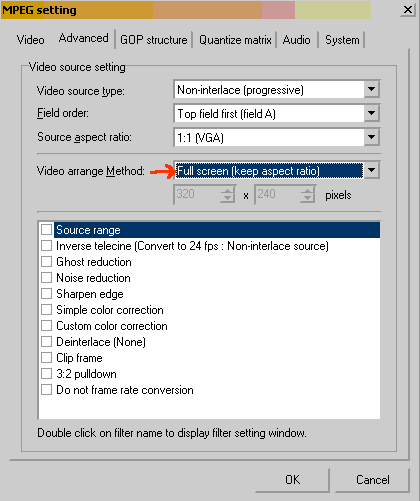
Settings and choose Advanced.
Select Full screen (keep aspect ratio) under Video
arrange method to keep the same aspect ratio(widescreen,fullscreen)
as the video source(if you have a widescreen movie and you
want it to be in fullscreen select No margin(keep aspect
ratio).
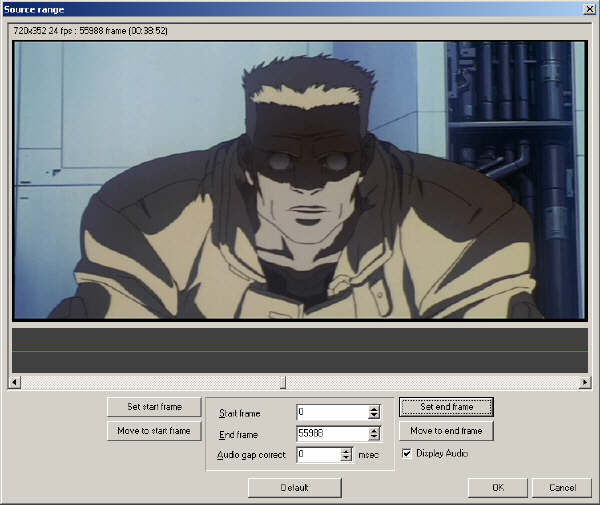
Select Source range and double-click on it with the
mouse.
- In
the next dialog you can choose the source range. This process
depends on the DivX file. If the DivX file is less than
80min (for a 80min/700mb CDR) then you do not have to split
the file to two CDs. Also if the DivX file is already in
two parts you have just to convert the first file and then
the second. But if there should be the case that the movie
is in one file over 80minutes long then it is necessary
to select the source range. In this new dialog you put the
horizontal scrollbar to the middle of the selection so that
you will get the same length on the first CD as on the second.
After you selected the middle do you have press Set end
frame. A new value should be under End Frame.
This value you should notice somewhere for the encoding
of the second part. Of course the start frame must
be 0.
- After
pressing ok, you only have to select the output file name.
I prefer the movie name with the CD number (e.g. Ghost
in the Shell CD1) for the burning.
Now encode the file by pressing the Start-Button.
While encoding you can select File->Preview(it
won't effect the encoding) to see how the output will be,
it it looks wrong(widescreen or fullscreen) you can stop
the encoding and start over and change especially the Settings->Advanced->Video
arange method.)
If you only want to burn the movie on one CD jump to the
burning guide else follow the next points.
- Repeat
the third, forth and fifth point. In the source range
dialog you now use as Start frame the noticed value and
move with the horizontal scrollbar to the end of the movie.
After pressing Set end frame, press two times OK.
- Now
select the output filename for the second file. (e.g. Ghost
in the Shell CD2) and encode it.
After the encoding is done and you did all right, you should
have for every CD a file.
Burning:
- Install
VCDEasy and launch it.
- First
we need to configure to burning. Select Settings and select
CDRDAO Integration and now you have to restart VCDEasy.

- Select
VideoCD type VCD 2.0 if making VCD.
Select
your CD Writer (if not in the list read the problems
section here)
Name of the CD Volume Label.
Select Browse to choose where to make the temporarily
output you need about 800 MB free harddrive space.
Add
the first encoded file (In this case Ghost in the Shell
CD1.mpg)
Hit Go for burning.
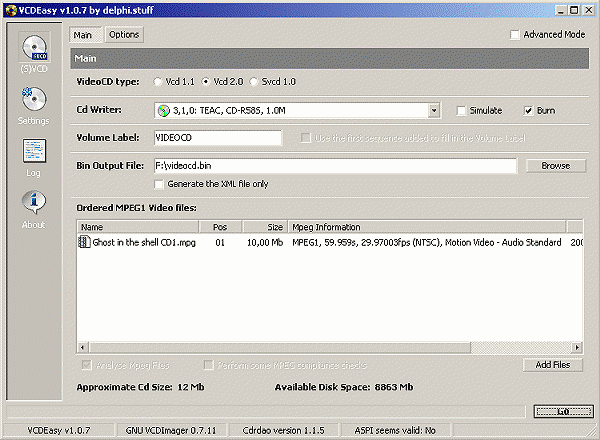
- Repeat
this and burn the second file (Ghost in the Shell CD2.mpg).
Done.
Problems:
If you have problem open ASF or WMV be sure
to use Virtualdub 1.3c because
newer versions don't support ASF/WMV
If you have problems extracting the audio
using Virtualdub try extract it using AVI2WAV
instead.
If you get problem burning with VCDEasy
read this or else you could burn with Nero.
If you have problems with Tmpgenc read here
In the very unrealistic case that in one DivX file is more
than 160 minutes of video, you of course have to split the
file into three parts. For this you of course use 1/3 of the
length as end frame.