Guide
Tools required: Latest TMPGEnc.
Install TMPGEnc by extracting all files in the zip file to a folder.
Now start TMPGEnc and open the Wizard(under File->Project Wizard if you have closed it).
Step 1 - Format
Here do we select what format to create. VCD, SVCD or DVD and PAL or NTSC. NTSC is the format standard in USA and Japan and PAL in the rest of the world. But many DVD Players and TVs support both NTSC and PAL standards so you should be able to make both. If your DVD Player or TV does not support one standard, then choose your countries standard whatever the source video is (but it is always best to convert to the same standard as the source video or else you will get jerky playback, read more about NTSC to PAL or PAL to NTSC here)
Select DVD -
NTSC if the video source is 29,97 or 23,976 or 24 frames/second (FPS)
PAL if the video source is 25 frames/second (FPS).
(Use virtualdub to check the source frames/sec, read here how to).
Select CBR MPEG-1 Layer II Audio (MP2) instead of PCM Audio(using MP2 you can use higher video bitrate which means higher video quality, if you have problem with MP2 audio try PCM Audio)

Step 2 - Select source file
Here do we select the video and audio source.
Open the video by clicking on Browse. The audio will be opened automatically(If you have a different audio source then choose it manually).
Note 1! If your source is DivX,XviD, ASF or SMR it is best to extract the audio separate to a wav with Virtualdub because TMPGEnc can not handle all audio sources that well(causes sync problems). But if you are converting from captured material such as DV,Huffyuv,MJPEG you can leave the audio same as the video.
Note 2! If you get an error when opening the video read here.
Note 3! If your video source is 23,976 fps(or 24 fps) then check so it says Film movie under Content of video. (Use virtualdub to check the source fps, read here how to).

Step 3 - Filter setting
Here we can add filters and also select source range and cut the video.
Select Other settings (if you wanna select a part of the movie click on Source range to select that part)

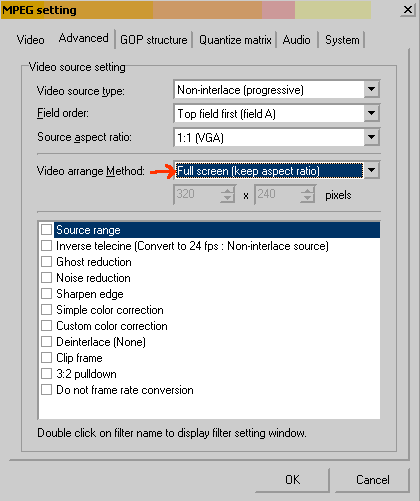
Other Settings
Click on Advanced
Change the Video arrange Method to Full screen (keep aspect ratio) if you wan't the movie to look exact the same as the video source.
If you have a widescreen movie and you want it to be fullscreen(no borders) select instead No margin(keep aspect ratio) and TMPGenc will cut it.
Bitrate setting
Here do we change what media you are going to burn and how big the video file should be, bigger file means higher bitrate which means higher quality.
Select DVD-R.
Select either in size how big the movie should be or use the Make file % of disk capacity.
Higher file size means better quality = higher average video bitrate means also then higher quality, about 4000-6000 kbits is used for original DVDs. You can try too see what looks good for you.

Encode
Last Hit OK to start the encoding.
(While encoding you can check if it looks okey, select File->Preview(it won't effect the encoding) and if it looks wrong(widescreen or fullscreen) you can stop the encoding and start over and change especially the Other Settings->Advanced->Video arange method.)

Now you are ready to burn it to DVD.
Problems:
Read here.
Other Info:
Configuring TMPGEnc for high-quality, DVD-compliant MPEG-2
More info here.